# Rule Templates
### Rules Fundamentals
The main concepts to understand for rules are the following:
* The [*type* or *category*](#concept-rule-categories) of the rules
* The[ *order* ](#order-of-rules)of the rules
* *When* the rules run
### Rule Type or Category
Rules for property mappings fall into 1 of 3 categories:
* Import Rules (Data transformation)
* Display Rules (Data validation)
* Export Rules (Data transformation)
Each type of rule can be reordered within it's own category, but you cannot move an export rule before an import rule
Import/Export rules (Data transformation) work on the raw source data and are applied to each individual data source's data.
Display Rules (Data validation) works on the data displayed onscreen after being retrieved from a Data Source.
### Order of Rules
Each type of rule can be reordered within it's own category, but you cannot move an export rule before an import rule The order that rules run in always follow the following order:
* import
* display
* export
You *can* reorder the rules (there are individual up/down buttons next to the header), but `export` rules cannot appear before `import` rules. Import/Export rules have an orange border, while display rules only have a gray border.
#### Concept: Individual sources
Import rules work on the raw source data and are applied to each individual data source's data.
> Each rule runs only on the source that it is being applied on (see image below)
#### Rule parameters
User scriptable rules (JavaScript) have access to 3 parameters, not just 1. See [Rule Template Parameters](https://sharpsync.gitbook.io/sharpsync/~/changes/zcOMaRcqMhiRElzWzdJZ/fundamentals/rule-templates/rule-template-parameters)
### Adding new Rules
A
### Setting up a Rule
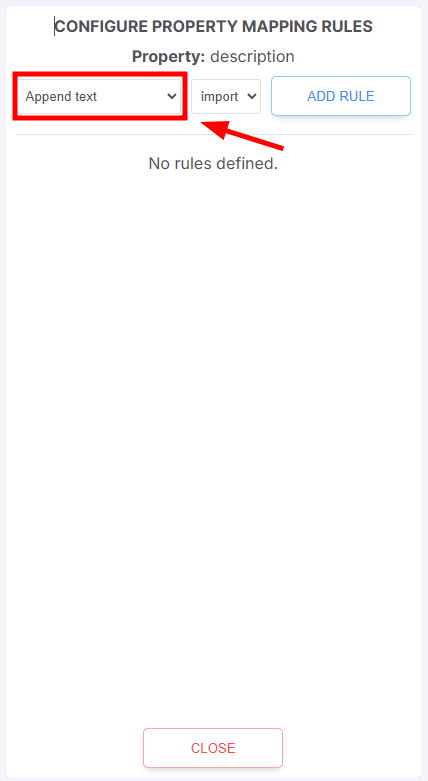
Start by navigating to Property Mappings and click on "Rules" for the Property Mapping you want to edit.
A panel will appear on the side. Expand the Rules dropdown to reveal the available [list of rules ](https://sharpsync.gitbook.io/sharpsync/~/changes/zcOMaRcqMhiRElzWzdJZ/property-mappings/rule-templates)that can be applied. Select a rule and click `ADD RULE`.
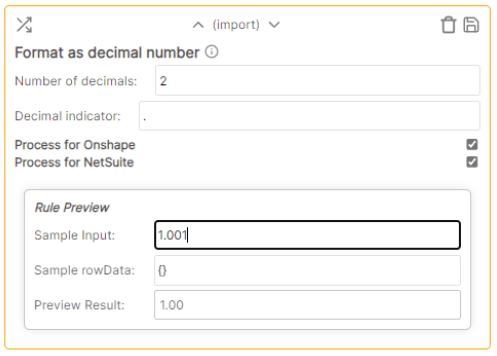
In the example below, the `Format as decimal number` rule runs for both Onshape and NetSuite. The rule runs on the individual strings of data imported.
The final result for both rules are overlaid in the user interface (the default would be a blue rectangle). Below is a conceptual illustration of the process:
*NOTE:* The rule running for NetSuite *is not aware of the data being imported from Onshape*. That means that when running a rule such as a JavaScript `Text Manipulation` rule, the rule runs only for one source at a time, never for both at the same time.
Pro tip: One way to get around this is to create a `Text evaluation` rule to match the value of a cell to that of another and return a display message to the user. Or use a `Text manipulation` rule to write a message to a cell value and give the user a message onscreen.
For example: Let's suppose that we have Data Source 1 (DS1) and Data Source 2 (DS2), the process would be:
**Step: Setup the property mappings**
* Setup the 1st column. Give it an accessor of `description` with a column mapping of property `description` for DS1 and for DS2
{% hint style="info" %}
As a quick reference, here are the instructions for setting up a [Property Mapping](https://sharpsync.gitbook.io/sharpsync/~/changes/zcOMaRcqMhiRElzWzdJZ/property-mappings/settings#adding-property-mappings).
{% endhint %}
* Setup a 2nd property column `description2` column. Give it an accessor of `description2`. Also map it to the `description` property.
* Add a `Text evaluation` display rule to the 2nd column.
**Step: Pulling the BOM + reviewing the data**
* For now let's say the value that comes from DS1 is the value `Coil`.
* Enable the setting on the 2nd column: `Prefer {DS2} Value`. This forces the value from DS2 to display instead of the value of DS1 displaying by default
* Add a `Text evaluation` rule. This rule has access to an `s` parameter (the current string value). Use the the following logic:
* If the value of `s` is equal to the `description` property, return a message to the user.
Written out in JavaScript it would look like this
```javascript
if (s === rowData.cells.description)
return { status: 'failure', message: `The values must not be the same` };
```
Note that returning any value in the `message` above can be customized by you.
The data from DS2 is imported after that of DS1. The rules start running for DS2.
Be sure also to read and understand [Rule Template Parameters](https://sharpsync.gitbook.io/sharpsync/~/changes/zcOMaRcqMhiRElzWzdJZ/fundamentals/rule-templates/rule-template-parameters).
### Display Rules
#### **Text evaluation**
\
Evaluates the cell value given the JavaScript expression. Available parameters:
* s (display value)
* rowData (the record containing the accessors data and additional metadata)
Notes on `rowData`: rowData is a object which contains the following noteworthy child items:
* rowData.cells (each cell value without modification. This can include the altered values as set in import rules)
* rowData.modifications (any modifications made by the user as at the time the rule is run)
Special notes:
Whenever you create a text evaluation rule that evaluates the value of *another cell*, you must take into consideration the modifications of the other cell.
e.g. if the accessor you're evaluating for is `myProperty1` and the condition is based on the value of accessor `myProperty2`, first check in your rule for the existence of `rowData.modifications.myProperty2`. If it exists, then use it, otherwise use `rowData.cells.myProperty2`. Example below
```javascript
// if the key (property mapping) exists in the object return its value,
// otherwise, return the value in the rowData.cells
const myValue2 = "myProperty2" in rowData.modifications ? rowData.modifications.myProperty2 : rowData.cells.myProperty2;
// now do something with the value you got above
if ({conditionBasedOnMyValue2})
return { message: `the message you want to return` };
```
Interpreting the Results
SharpSync processes and prioritizes each rule in order from top to bottom. Moving a rule up or down the list can change the result depending on the subsequent outcome. See the examples below to gain an idea of how results are evaluated:
**Example 1: Text-based Rule Application**
**Preconditions**
* Property Mapping: Description (Text)
* Sample Cell Data: "Connector Bracket 1\_REL"
**Rules**
1. Prepend Text: "ABC-"
2. Text Must End with String: "\_REL"
3. Maximum Text Length: 25
**Evaluation**
1. [PASS](#user-content-fn-1)[^1]: Text is appended to be "ABC-Connector Bracket 1\_REL"
2. [PASS](#user-content-fn-1)[^1]: Text does end with the string "\_REL"
3. [FAIL](#user-content-fn-1)[^1]: Text length is longer than maximum. Text was originally 23 characters; the prepended text makes the character length 27.
* Quick Fix: change the text in SharpSync by removing characters or abbreviating words. Data Sources can be updated when the BOM is submitted with the changes, depending on the Property Mapping settings.
* If the Maximum Text Length was ordered before the Prepend Text rule, all rules would evaluate as [pass](#user-content-fn-1)[^1].
**Example 2: Numeric Rule Application**
**Preconditions**
* Property Mapping: Weight (Numeric value)
* Sample Cell Data: "123.54 kg"
**Rules**
1. Replace Text (removing spaces)
* Orginal Value: " "
* New Value: ""
2. Format as Decimal Number
* Number of Decimals: 0
* Remove Text: kg|KG|g|lb|lbs
3. Round to Nearest X: 1
4. Number Between
* Min Value: 1
* Max Value: 123
**Evaluation**
1. PASS: Space is removed, new text is "123.54kg"
2. PASS: Text is changed to Decimal. Any characters after tenth place is dropped. New value is 123.
3. PASS: Decimal is rounded to the nearest whole number of 123.
4. PASS: Number is between or equal to the minimum and maximum values of 1 and 123.
* If the 2nd and 3rd rules were reversed, the last rule would fail. The number would be rounded first, which would result in the new number being 124, which is larger than the last rule's maximum value.
### Rule Legend
Color scheme
Description
Orange border - Value did not pass display mapping rule (Warning)
Red border - Value did not pass display mapping rule (Error)
[^1]: Displayed in the context menu in the BOM Comparison screen